
You are currently browsing the category archive for the ‘nerdiness’ category.
I started teaching myself Docker during my time off December 2016. I grabbed my  Ubuntu laptop, loaded up Docker and got to work. Docker is really easy to pick up and get started with. I even loaded it up and build a few containers for a Raspberry Pi. 🙂
With Windows 10 and Windows Server 2016, Windows containers are now available. You can get a base Windows container from Docker hub and run it from one of these OS’s. Be forewarned, the images made from Windows Core are 10GB in size! So much for being light. At least you only need to download them once.
I have and old (unfinished) ASP.NET MVC site running at http://brettski.com. I figured this would be a good candidate to throw in a container since it has no external dependencies, like databases, etc. It runs on ASP.NET MVC 3 or 4 and dotnet framework 3.5.
For windows base containers there are two bases I have seen from Microsoft: Windows Core and Windows Nano. Since I haven’t worked with Nano and understand it is really stripped down, I decided to start with Windows Core.
Since the site runs on IIS, I started with the Microsoft/IIS container. The container is a build of Windows Core with web server role added. I started out with the following Dockerfile for my site which is located at the root of the solution. I published the site to ./brettski4/pub/release/, so it may be easily mapped in the file.
#FROM microsoft/iis:latest

# copy compiled code into container
# build sent to /pub
RUN mkdir c:\\website
COPY .\\brettski4\\pub\\release c:\\website

WORKDIR c:\\website

# Add features
RUN powershell -Command Add-WindowsFeature -Name Web-Server; \
 Add-WindowsFeature -Name Web-Asp-Net

# Add sites
RUN powershell -NoProfile -Command Import-Module IISAdministration; \
 New-IISSite -Name "brettskicom" -PhysicalPath "c:\website" -BindingInformation "*:8088:"

EXPOSE 8088

ENTRYPOINT ["C:\\ServiceMonitor.exe", "w3svc"]
It’s a really simple Dockerfile. It starts by using the microsoft/iis:latest container image. It then makes a directory in the container for the site files (c:\\website). Copies those files from the local machine into the container’s new directory, and finally makes the workdir c:\\website, which isn’t really needed for this container.
I needed to add two features to the container, ASP.NET application service and DotNet 3.5 (which isn’t in the file above). This is the first place I was tripped up as ASP.NET 3.5 cannot be loaded in this container, it’s isn’t an available option! Either is Dotnet Framework 3.5. An error is raised that the source files are not available. I wasn’t sure where to get them on the web, or what exactly was needed to add them (WSIM, etc.).
So sought out a different container. Looking through the containers in the Microsoft Docker Hub listing I came across microsoft/aspnet. Which is tagged for two versions: 3.5 and 4.6.2 (which has a few flavors). Going for the microsoft/aspnet:3.5 container image I updated my Dockerfile to add in web-server and asp.net application service.
FROM microsoft/dotnet-framework:3.5

# copy compiled code into container
# build sent to /pub
RUN mkdir c:\\website
COPY .\\brettski4\\pub\\release c:\\website

WORKDIR c:\\website

# Add features
RUN powershell -Command Add-WindowsFeature -Name Web-Server; \
 Add-WindowsFeature -Name Web-Asp-Net45; \
 Invoke-WebRequest -Uri "https://github.com/Microsoft/iis-docker/raw/master/windowsservercore/ServiceMonitor.exe" -Outfile "c:\ServiceMonitor.exe"

# Add sites
RUN powershell -NoProfile -Command Import-Module IISAdministration; \
 New-IISSite -Name "brettskicom" -PhysicalPath "c:\website" -BindingInformation "*:8088:"

EXPOSE 8088

ENTRYPOINT ["C:\\ServiceMonitor.exe", "w3svc"]
This Dockerfile starts out the same but is a bit different when adding features. We add Web-Server, and ASP.NET 4.5. Since this container didn’t come with IIS, Microsoft didn’t add the ServerMonitor.exe executable, I decided to grab it from the GitHub repo and save it in the container.
I am still not 100% sure what ServerMonitor.exe is used for, though it seems to keep the container active after it starts. From what I have read, people had added useless loops written in powershell to have some type of process running at the start of the container. Running ServiceMonitor.exe while in the container only says, Usage: ServiceMonitor.exe [service name]. So little help there.
So this was my Tuesday, in between other things, getting something to work inside a Windows container. If you haven’t played with Docker yet, I strongly suggest that you do. It is quite easy to get started with, and containerization is going to continue to grow as big if not bigger than Virtual Machines did.
The Container image built is in my Docker repository here.
So I read today:
-
Amazon Fire TV now supports 4K Ultra HD for true-to-life picture quality. Watch high-definition 1080p streams on Amazon Video, Netflix, YouTube, Hulu and more, even without a 4K TV.
Today is 7/1/2016. By 2018 it will be 16k or maybe 32k true-life picture.
Another issue has arisen with my Windows 10 external boot on my Mac Book Pro. There was an large update for Windows 10 which was failing. The reason, you can’t install windows on a usb flash drive using setup. Sigh.
After a quick google search the fix was simple enough. You simply go to registry key HKLM:\SYSTEM\CurrentControlSet\Control and change the value for PortableOperatingSystem from 1 to 0.
The part I didn’t expect is that now my MBP wants to boot the the external drive by default. I am sure setup changed this in the boot partition. My fear is bricking the MBP partition as I am not as familiar with its configuration. I can still easily hold down the option key to cho0se the partition to boot to, though I don’t want to do this each time going into OSX as I use it 90% of the time now.
Under system preferences I opened Startup Disk, unlocked it and selected the Macintosh HD drive (the only one in the list by the way as my external drive is disconnected). I then clicked the restart button.
Hey, that worked, cool. The MBP now boots to OSX on restart or power-up, nice.
I have always known Microsoft OS’s to be a bitch with boot partitions (thinking back to old Linux multi-boot systems I had). It has just been a while since I have been bit by it and I guess in a way I would have hoped they would have improved on things a bit.
In June I purchased my first MacBook Pro (I should really write about this sometime). One simple feature I really enjoy is that the machine will announce the time at the top of each hour. I don’t know why, I just really like that feature.
At work I am still on Microsoft Windows-based machines and wanted to have this same feature on them. So I did some digging around and found a VBScript that will do it. I added the code below to a sayhour.vbs file and set up as a scheduled task to run at the top of the hour. I have all my clocks showing 24 hour time so their is no need for AM or PM, which personally drives me batty anyway.
' Say the following hour
Dim speaks, speech
speaks= "It's " & hour(time) & " hours"
set speech = CreateObject("sapi.spvoice")
speech.Speak speaks
Spending so much time in PowerShell now I wanted to solve this same issue there. Again some looking around and digging in to the C# library SpeechSynthesizer I have a solution. This too will run from a scheduled task. The only part I have not been able to figure out is how to keep the cmd box to show when it runs. The below code is saved in a sayhour.ps1 file and set up as a schedule task to to run at the top of the hour.
# Say the following hour
Add-Type -AssemblyName System.speech
$speech = New-Object System.Speech.Synthesis.SpeechSynthesizer
$speech.Speak("It's $((Get-Date).hour) hours")
I know have my machine at work saying the hour at the top of the hour. I quite like it.
So recently I purchased my first Mac. After 30+ years of using Microsoft OS’s for the majority of my work I have gone to the other side and purchased a MacBook Pro. It is a great computer, something I may go into with another post. There are UI elements I miss from Windows, some I have found ways to do in iOS and other I have been not so lucky.
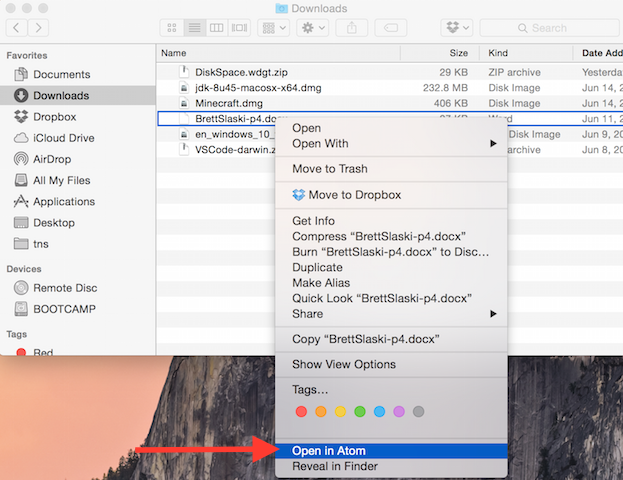
One feature I use constantly on my Windows machines which is missing on the MacBook is to right click on a file and choose Notepad++ (or Atom, etc.) to open that file. This is regardless of the file type, I am not referring to file associations to applications here.
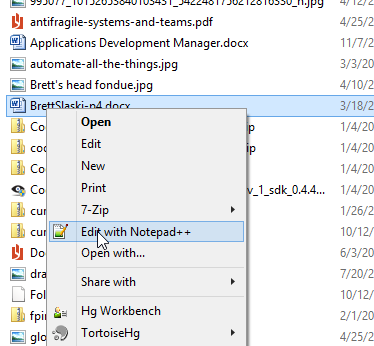
Not having this functionality while working on my Mac really slows me down at times. I needed a solution and found one, and would like to share it with you now.
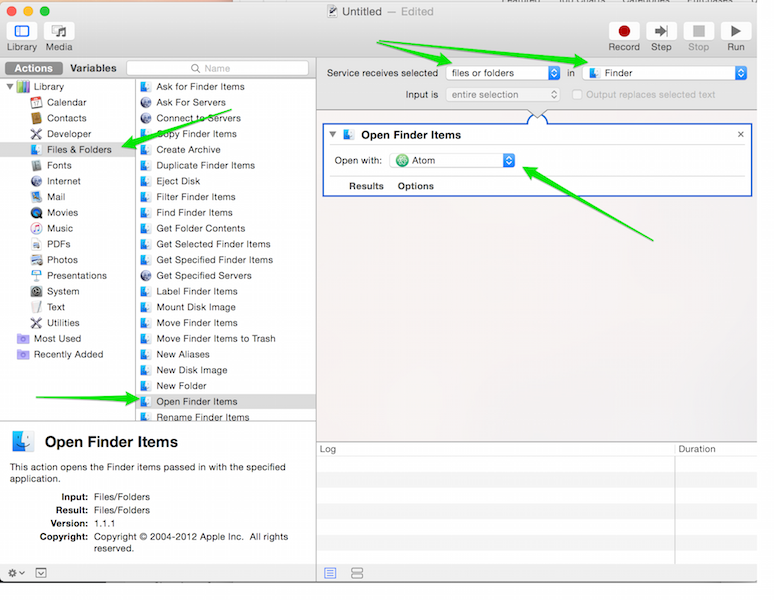
The solution uses an application called Automator. Automator was already installed on my machine, I don’t know if it standard or not. Now that I have done it, the process is quite simple (there is a reference image at the end of the post):
- Open Automator
- Create a new document of type System
- In Library select Files & Folders
- This will open options in the next pane
- In the next pain select Open Finder Items then drag this into the workflow pane
- Within the item you just dragged in is a dropdown labeled: Open With:
- Select the application you want to open the folder or file with. I have selected Atom.
- At the top of the workflow pane are two dropdown selectors.
- The first selector choose, files or folders
- The second selector choose, Finder
- So it should read, “Service receives selected files or folders in finder“
- Save the document with the name that you want displayed in the right-click (secondary) menu
- I used “Open with Atom“
That is all there is to it. If you open Finder and right-click on a file or folder you will see the option Open with Atom (or whatever you decide to call it).
Setup in Automator:
Because I tire of looking up each time when I need to send a test message, I am adding this here for a quick reference.
Commands are bold
data is italics
telnet servername 25
helo somename
mail from:[email protected]
rcpt to:[email protected]
rcpt to:[email protected]data
subject:your subject information here
Body stuff goes here and here and here, etcetera, etcetera…
.
In case you aren’t aware, you terminate an SMTP email with a period by itself on it’s own line. That is not a typo.
Of course now that I think about it, I will have to look this up as well, Google is probably faster. 🙂
A tall high-five to the employees at Double Fine. That cool indie game company out of San Francisco headed up by the legendary Tim Schafer. Why? do you ask. Well let me tell you.
My eldest son just finished the sixth grade where he was in the gifted program. This year his teacher decided to try the Genius Hour program in her classroom. Genius hour is a movement that allows students to explore their own passions and encourages creativity in the classroom. It provides students a choice in what they learn during a set period of time during school. The teacher planed to have a few Genius Hours throughout the year. The first two Genius hours the students may pick any subject that they don’t already know about. The third Genius hour the students needed to pick a future career. After the students learn about their subject they put together a report and short presentation to explain what they learned, etc. to the rest of the class.

For his first Genius Hour he chose ink as a subject to learn about. He never really said why, “just because I was interested in it”, he would say. Okay, cool. He sure has brought up some interesting ink facts over the last few months I must admit. I never did see his presentation, but I believe he received a perfect score.
His second Genius Hour was on building games in Unity3d. He went through one of their tutorials to build a top-down space shooter game. This was followed by a presentation of what he did and what he learned. One conclusion of his project he discovered he prefers is creating content and story-lines over hacking on code.
 It’s his third Genius hour, future career, that I am writing about here. The teacher had the students research the chosen career and interview someone in that field. My son chose, “Senior Developer at an Indie Game Company.” As a programmer myself, this sounded interesting. And who wouldn’t want to create games for a living? I know I would love to! It seems natural that he would pick game development of some type. Since he was very young, at least three, he would make up games all the time to play with people. His Grandmother Debbie played these games with him the most. She would say they are really creative, though, of course, skewed for him to win. 😉 He has continued to create games with parents, friends, neighborhood kids, etc. and they are much more fair now (so we think… j/k).
As time went on an his deadline came closer I kept asking him how things are going. He usually responded that he was researching about the job but had not found anyone to interview. I thought he may be able to interview me, though honestly I am, at best, an aspiring game developer. I thought of a few friends at work, but they didn’t fit well either. Until one day I thought of Double Fine. Oh that would be perfect!
I first heard of Double Fine through their Kickstarter, “Double Fine Adventure“. I have always loved Tim  Schafer’s games and the fact he wanted to raise money to build one without the bureaucracy and bullshit of production companies. I’m all for it, sign me up! On top of that they planned on filming the making of the game and provide that movie to backers. When I saw this, I had to have a copy of the movie. Mostly because I hoped it could give an inside view for my son on what goes in to these computer games he loves to play and design.
So my next question was, how to contact them? I started with the basics, the about/contact page on their website. I found a general email address and started crafting an email. It was a horribly written email, I have no idea what I was smoking at the time. My wife still loves to rib me about my appalling use of the English language. Though this didn’t matter. I sent the email on Friday, April 25th at 17:32 Central Time. I didn’t expect to here back from anyone until the following week. By 18:02 that same day I received a response which started out with:
“I’ve forwarded your e-mail to the whole company and there are already a few that are more than happy to oblige. You should be getting a separate e-mail from one soon.”
What!? Are you kidding me? That is freak’n awesome! I really didn’t think anyone would really be interested. I was flat out wrong. A few seconds later I received an email From Ben Burbank, a senior developer at Double Fine. Him and another showed interest and agreed to an interview. After a while there where a few more who were interested as well. At this point I was kind of hoping to hear form Tim himself, though I knew that was a pretty tall order. The overall response from the company’s employees was so warm. They expressed so much interest in helping. It was refreshing very appreciated.
I had my son plan out the time and interview with Ben and others. He needs to learn these things, I got him the contact, he can run with it. Which he did pretty well.
The day of the interview Ben and others spent close to one and one-half hours on Skype with my son. That was so completely awesome. I am so happy I reached out to Double Fine, the results turned out better than I had hoped.
My son finished his interview, wrote up his paper and completed his presentation all on time. He “winged” the presentation, which I wasn’t too happy about. Though he needs to learn in his own way. His score reflected his input.
It is now a couple of weeks into Summer break and he has not stopped creating. He put together a mod pack for Minecraft to design some mini games around. And just today, designed some floor game using dice and army men which he said he really liked the outcome of and plans on writing up rules/instructions.
Needless to say, but I will anyway, I am so proud of my son.
I have real simple advice for him, “Never stop being awesome.” Everything else will fall in to place.
To the great people of Double Fine:
Thank you so much for taking time out of your day, your life, to give a little of yourself for the benefit of my son. I really appreciate you. And hey, you never know, maybe one day he may be the Senior Developer in an Indie Game Company at your company. 🙂
If you are every in the Chicago area, give me a call, I’ll buy you a drink.
I have spent the last few months at work standardizing system builds and creating simple scripts and checklists to help maintain them. As you may know this is a very labor-intensive way to go about things. Its inability to scale is already showing strong even with the few dozen servers we manage.
Another pain point is the lower environments. The scripts are written for production. Though I try to keep them as generic as possible, there are just things that aren’t generic, like bound IP’s. So now that we are moving our standard build to all environments this is starting to shard our deployment processes. Something I would like to avoid.
A logical step you may be screaming right now, is automation tools! Apply a deployment automation framework like Chef, Puppet or PowerShell DSC. I can’t disagree, but time is very limited and the first step toward a framework needs to be made carefully.
I knew from experience that automation will be needed, but I intentionally didn’t start there as what exactly needed to be automated or to what level wasn’t known. And for the most part this still isn’t fully known–and that’s okay. That’s why whenever approaching such targets you do so in small iterations (batches) and review your progress continuously.
Instead of starting out coding the configuration of my server I started with a checklist of everything which goes into it. I assume if I was a seasoned Chef user (for example), I may start with a Recipe and start defining my server that way, but I am not a seasoned Chef user, or puppet, orPowerShell DSC, or super-automater-X. I am an administrator who still follows chec klists and runs scripts to do much of my work, and I am drowning. Time for the next step, time for an automation framework, but which to choose?
This is where the overwhelming part comes in as I try to determine which way to go in a world I know little about. I understand the concepts and operation of these things, but I have no idea the effort required to implement one technology over the other, and which ones will work best in our environment.
Am I afraid to do some good old fashion research and testing? No. I really don’t think so. Time is such a factor now and none of this is supported by my mangement. I am doing this because I know it needs to be done. They wont buy into it until they know its a sure thing (sigh). I would hate to spend a week digging into a solution to determine that it doesn’t work. Well honestly, what is the problem with that? It isn’t like I will not learn from it either way, if the path is successful or not. What I would really like is to know which is the most logical way to go for a Windows platform. A pros and cons list may even be a good start, as long as its written neutrally.
![]()
![]()

Obviously PowerShell DSC is fully supported on windows. 😉 And the reading I have done on Chef and Puppet describes they support windows machines as well (Though neither list Server 2012). PowerShell DSC is new and rough around the edges and both Chef an Puppet have been banged around for a while. But without learning each one and trying them out, how am I to know a logical path to go down. Analysis paralysis anyone?
Have you gone down this path? Do you have some resources to suggest?
I love computer games. I have been playing them since I was able to use a computer. I can’t say I am an avid gamer, I really don’t have the time for that, but I sure enjoy playing them.

One game I play often, and usually with my sons, is Minecraft. A sandbox adventure game which we have found very fun. We have spent countless hours building different things, going on adventures and PvP fighting.
On a cold night in November I started digging in to MinecraftForge. A modding system for Minecraft. In short time my oldest son and I created two ‘Mods’ for Minecraft: Stonecraft and GrackMod.
I really enjoyed manipulating the game play. I found it very satisfying to interact with items we added to the game. Play with rules we developed. It was just cool.
A month or so prior to this a friend of mine introduced me to Unity3d. A game development environment which allows you to release 2D and 3D games to many different platforms. And you can do all your scripting in C#! JavaScript I believe is the other scripting language available.

Acting on the bug which bit me writing the Minecraft mods I downloaded Unity3d and started playing around. Quickly I figured out this stuff is pretty complex, there is simply a lot to it. Off to the tutorials!
The first tutorial I found was a top-down shooter game called, Space Shooter. You fly a simple spaceship and shoot asteroids flying toward you. It’s a basic 3d game which covers many of the very basics of building a game in Unity3d. My version can be found here.
Of course I couldn’t leave the tutorial as is. Once built I added a high score, increasing difficulty with more asteroids and faster asteroids. The overall experience was good and I want more!
Since I can’t draw for shit, and am not very creative with design tools, I plan to stick to the 2d world of gaming. Modeling 3d objects just scares me. So you may ask, where do you plan to get content? Well, two main sources, first, is my son who is a better artist than he realizes and second I will end up buying available content. I have found some decent stuff already (links needed) and I assume I can find someone to create some stuff form me.
Next on the list is to build a tower defense game. I found at least one tutorial to build one. It’s not 2d but I am hoping it will provide more depth into maintaining more cloned prefabs, controlling their paths and player’s placing items. Hey, who doesn’t like tower defense games?
See one of my ultimate goals is to build a SimTower type game. A game I really enjoyed in the past, which doesn’t work on most new hardware (though I do still run it in an XP VM on my Win8.1 box!). Can I improve on the game? I have no idea, but I am going to build my version and see how it goes. I don’t plan to get caught up in cloning the old game, I just want to take it a step (feature) at a time and see where it goes. I think it will be a lot of really-frustrating fun to build. The whole reason I build things in the first place. What fun would it be if it was simple? It would be boring and be lame.

I’ll update progress as I continue tutorials and build new stuff. I plan to keep all of it available in GitHub so others may use it for examples or whatever.
On and off for the last couple of months I have been learning Erlang. My primary source for this is a decent booked named, “Learn You Some Erlang for Great Good!” (Fred Hebért, (c)2013 no starch press). What a great name, no starch press (: I first found this tutorial online at http://learnyousomeerlang.com/. The entire book is there, believe it or not. I worked through the first few chapters and was hooked. I decided to purchase the book to help pay for the work and for it to be more convenient to read. But I digress, back to IIS & Mercurial.

The whole reason for the Erlang digression is that I was going through examples in the book on different computers. After I was done with the session I would have copy my practice files back to my home server, which was a pain on a disconnected Linux box. To solve this, I figured, why not setup a repo at home. I have been wanting to do this for a while anyhow. Now I could setup an SVN repo in a few minutes, but I don’t really use SVN anymore (“It’s so 1990’s (: ). Mercurial is my DSCM of choice. I have nothing against GIT, and do use it, I just regularly use Mercurial.

My home server is Microsoft Windows Home Server 2011. Basically Windows 2008 R2 (IIS 7.5) with some other “stuff” thrown in. Finding installations for a Mercurial server under Windows is not a simple task. There are articles out there, most of them are old or incomplete.
This walk-through, http://www.jeremyskinner.co.uk/mercurial-on-iis7/ [Jeremy’s article], is good and walks well through the process. Unfortunately it is out of date and doesn’t cover well what needs to be installed today to get this to work. The first part of my pain as things weren’t working. I am thankful for its explanation of adding CGI support in IIS7, something I haven’t needed to do in IIS7 before. One thing this article mentions (in bold) is to use x86 installer of Python, even if your machine is 64-bit. I believe this is no longer accurate as I installing 64-bit Mercurial and 64-bit Python and all is working fine.
For the start of my journey I was using this walk-through along with a few Mercurial wiki pages: http://mercurial.selenic.com/wiki/HgWebDirStepByStep and http://mercurial.selenic.com/wiki/PublishingRepositories. I was understanding how the publishing works, but not getting things to work on my Windows server. Mostly my error was around Python not being able to find hgweb stuff. It was blowing up on application = hgweb(config), and said application undefined. The additional Mercurial installation I needed was located here: http://mercurial.selenic.com/wiki/Download#Windows which I found in a helpful wiki artical, http://mercurial.selenic.com/wiki/HgWebInIisOnWindows. If you follow this article straight through, you will almost have a successful installation. What I learned from this page is that the Python module installer needs to be run. This adds Mercurial modules to Python. Something which is needed and not specified in the other installation instructions.
If you don’t like the command line, the IIS configuration in the Mercurial wiki article is done through the command line. You can reference how to do these through the UI using Jeremy’s article.
My suggestion after going though this, this morning is to use both articles. Read through them first, before installing anything, then plan your attack and go for it. Oh and yeah, you’ll need to refer to the Publishing Repositories wiki page.
- “Setting up a Mercurial server under IIS7 on Windows Server 2008 R2”
- “Configuring HgWeb in IIS on Windows”

A few things I learned from this morning’s adventures
- Within the hgweb.config file the section [collections] is no longer needed, the section [paths] may be used instead. There is more information around this here: http://mercurial.selenic.com/wiki/PublishingRepositories
- Within hgweb.config a path of / = /path/to/repo/* will show (publish) all repositories.
- Withing hgweb.config using allow_push = * allows any user to push to the repository. Using this settings negates the need to enable authentication on the web. Yes this makes things insecure, but my setup is internal to my house only.
So sure this took a bunch of hours to figure out and get working correctly. Though now it is working correctly and I have my working Mercurial repository like I have been wanting for some time. Plus I have learned a bunch of stuff too. Perhaps I’ll go play a game now.

